How to Connect Your Booking Website to Your Own Domain
Already have a domain you want to use? You can connect it to your Holidu booking website to drive more direct bookings under your own brand. This guide will walk you through the entire process step-by-step.
Before You Start
Make sure you have access to your domain provider's settings (such as AWS, Vercel, GoDaddy, or other domain registrars). Keep in mind that if you already have a website live on that domain, it will be replaced by your direct booking website once this process is complete.
Step-by-Step Guide to Connecting Your Domain
Step 1: Enable Your Booking Website and Start the Domain Connection
Begin the process directly in the Holidu app:
- Click Enable website if it is not already enabled.
- Click Connect my domain.
- Enter your existing domain name when prompted.

Once you enter your domain, a DNS tab will appear with specific DNS values that Holidu generates for you. Copy these values carefully—you'll need them in the following steps.
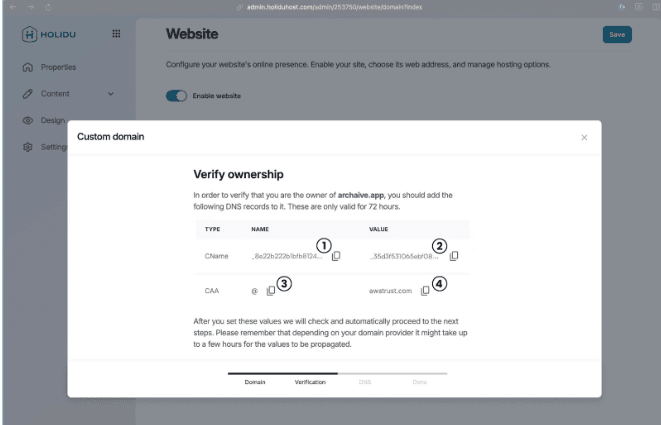
Tip: Don't worry if you're not familiar with DNS settings. We'll guide you through each step. DNS (Domain Name System) is simply the system that connects your domain name to your website.
Step 2: Create a CNAME Record in Your Domain Settings
Now you'll log in to your domain provider and create the first DNS record:
- Log in to your domain provider account.
- Look for an option to create a new DNS record or edit DNS settings.
- Select CNAME as the record type.
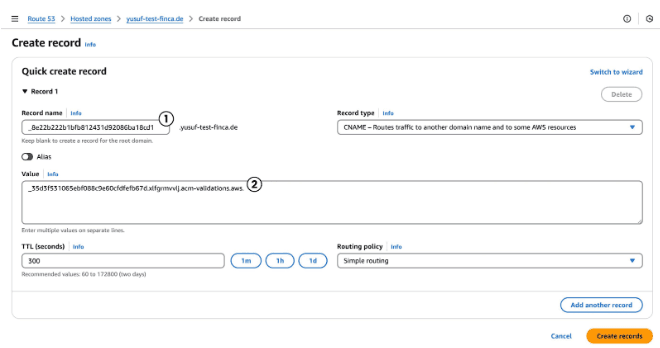
- In the Holidu app, find the CNAME line and copy the "NAME" value (marked as 1).
- Paste this value into the name field of your domain provider's record form.
- Copy the "VALUE" from the same CNAME line (marked as 2) in the Holidu app.
- Paste this value into the value field of your domain provider's record form.
- Leave the "TTL" and "Routing policy" fields with their default values.
- Save the record.
Example (AWS):
Important: If there are already other records saved for the domain you want to use, delete those first. This will disconnect your existing website from the domain, making it temporarily inaccessible. This step is necessary so you can connect the domain to your new direct booking website.
Step 3: Add a CAA DNS Record in Your Domain Settings
Create a second DNS record in your domain provider's settings:
- Create a new DNS record.
- Select CAA as the record type.
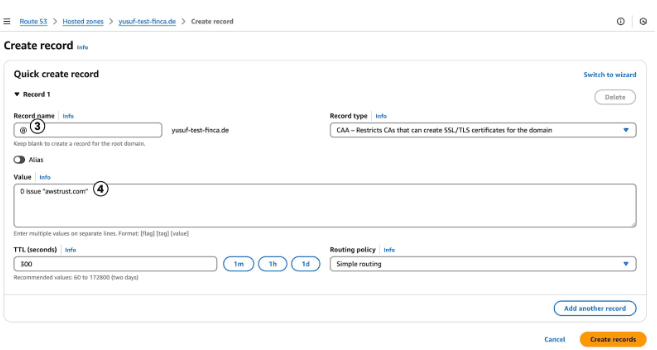
- In the Holidu app, locate the CAA line and copy the "NAME" value (marked as 3).
- Paste this into the name field of your new record.
- Copy the "VALUE" from the CAA line (marked as 4) in the Holidu app.
- Paste this value into the value field of your record.
- Note: Some domain providers require a special format for the value field. If your provider asks for a format like 0 issue "yourdomain.com", place the value from step 5 in quotation marks.
- Leave the "TTL" and "Routing policy" fields with their default values.
- Save the record.
Step 4: Wait for Holidu to Verify Your DNS Records
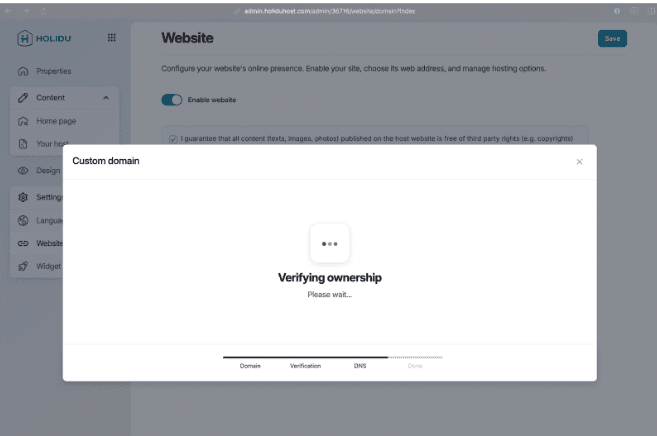
After you've added the records in your domain provider's settings, Holidu automatically checks your DNS configuration. This verification process typically takes around 5 minutes, but it can occasionally take longer.
Go back to the Holidu app and wait for the system to confirm that your records are recognized. You'll see a confirmation message once everything looks correct. At this point, your domain is verified and you're ready to move to the next step.
Step 5: Add an ALIAS DNS Record in Your Domain Settings
Once Holidu has verified your domain, there's just one more DNS record to add:
- Return to your domain provider's settings.
- Create a new DNS record.
- Change the record type to ALIAS.
- Copy the values that Holidu provides in the final setup step.
- Follow the same process as before: copy the name and value from Holidu and paste them into your domain provider's form.
- Save the record.
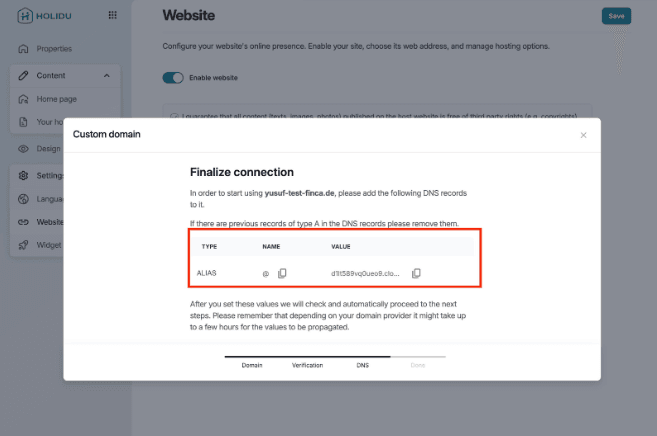
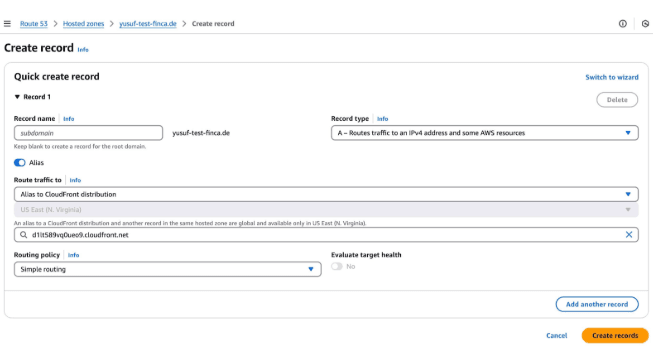
Verification Checklist: Before moving to the final step, make sure your domain provider settings now include all three of the following records:
- ALIAS
- CAA
- CNAME
All three records are essential for your direct booking website to connect properly to your domain.
Step 6: Final Verification and Launch
Return to the Holidu admin dashboard and wait for the final domain verification to complete. Once verified, you'll receive a confirmation:
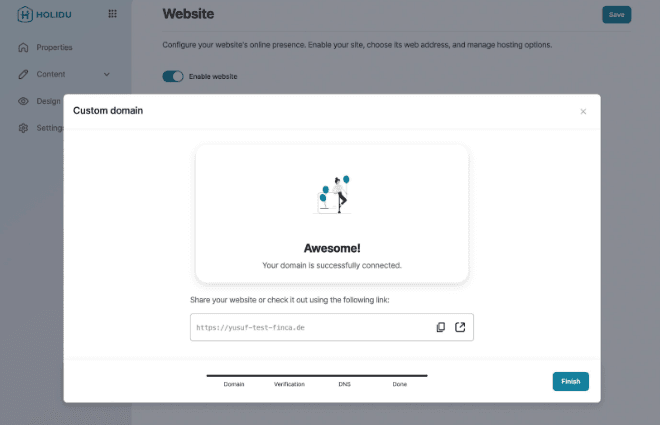
Congratulations! Your direct booking website is now live on your own domain. You can access your booking website by visiting your domain in any web browser. Your guests can now discover and book from you directly under your own brand.
Troubleshooting Tips
DNS verification is taking longer than expected: DNS changes can take up to 48 hours to propagate across the internet, though this usually happens much faster. If verification hasn't completed after 5 minutes, wait a bit longer and try refreshing the page.
Domain is still showing the old website: This can happen if DNS records haven't fully propagated. Try clearing your browser cache and waiting a few minutes before checking again.
Need help with your specific domain provider: Each domain provider has slightly different terminology and interfaces. Refer to your provider's documentation for specific guidance on creating DNS records, or contact their support team if you need additional assistance.
Next Steps
Once your domain is connected and your direct booking website is live, consider customizing your website further to match your brand. Explore Holidu's website customization options to add your logo, colors, and property descriptions that will help drive more bookings.
Do you want to contact us?
We’re here to help. You can contact us directly if you need assistance or have questions.
Contact us